11 minutes
Home Office Killed My Laptop Battery
This post is a collection of things I learned about batteries. This is my adventure diving into why doing too much home office killed my laptop battery, and my journey replacing it. It is not necessarily data-driven, but at least data-intuited.
Motivation
Before the pandemic, my laptop (a ThinkPad) was on and off the charger. I was walking around university, sitting in lectures, going to the library. I would charge my laptop when the battery was getting low, and then disconnect the charger again.
During the pandemic, my laptop was always sitting on my desk, connected to a monitor, a docking station — and a charger. It spent several months at full charge.
As of early 2020, my laptop was 3 years old and the battery capacity still at 85%. Over the course of the next 12 months, its capacity dropped to 65%. With a design capacity of 57 Wh, this is a drop from 48 Wh to 37 Wh. At a power consumption of 5 W, this is 2 hours less runtime! And it is a drop by 20% over 1 year, versus a drop of 15% over 3 years.
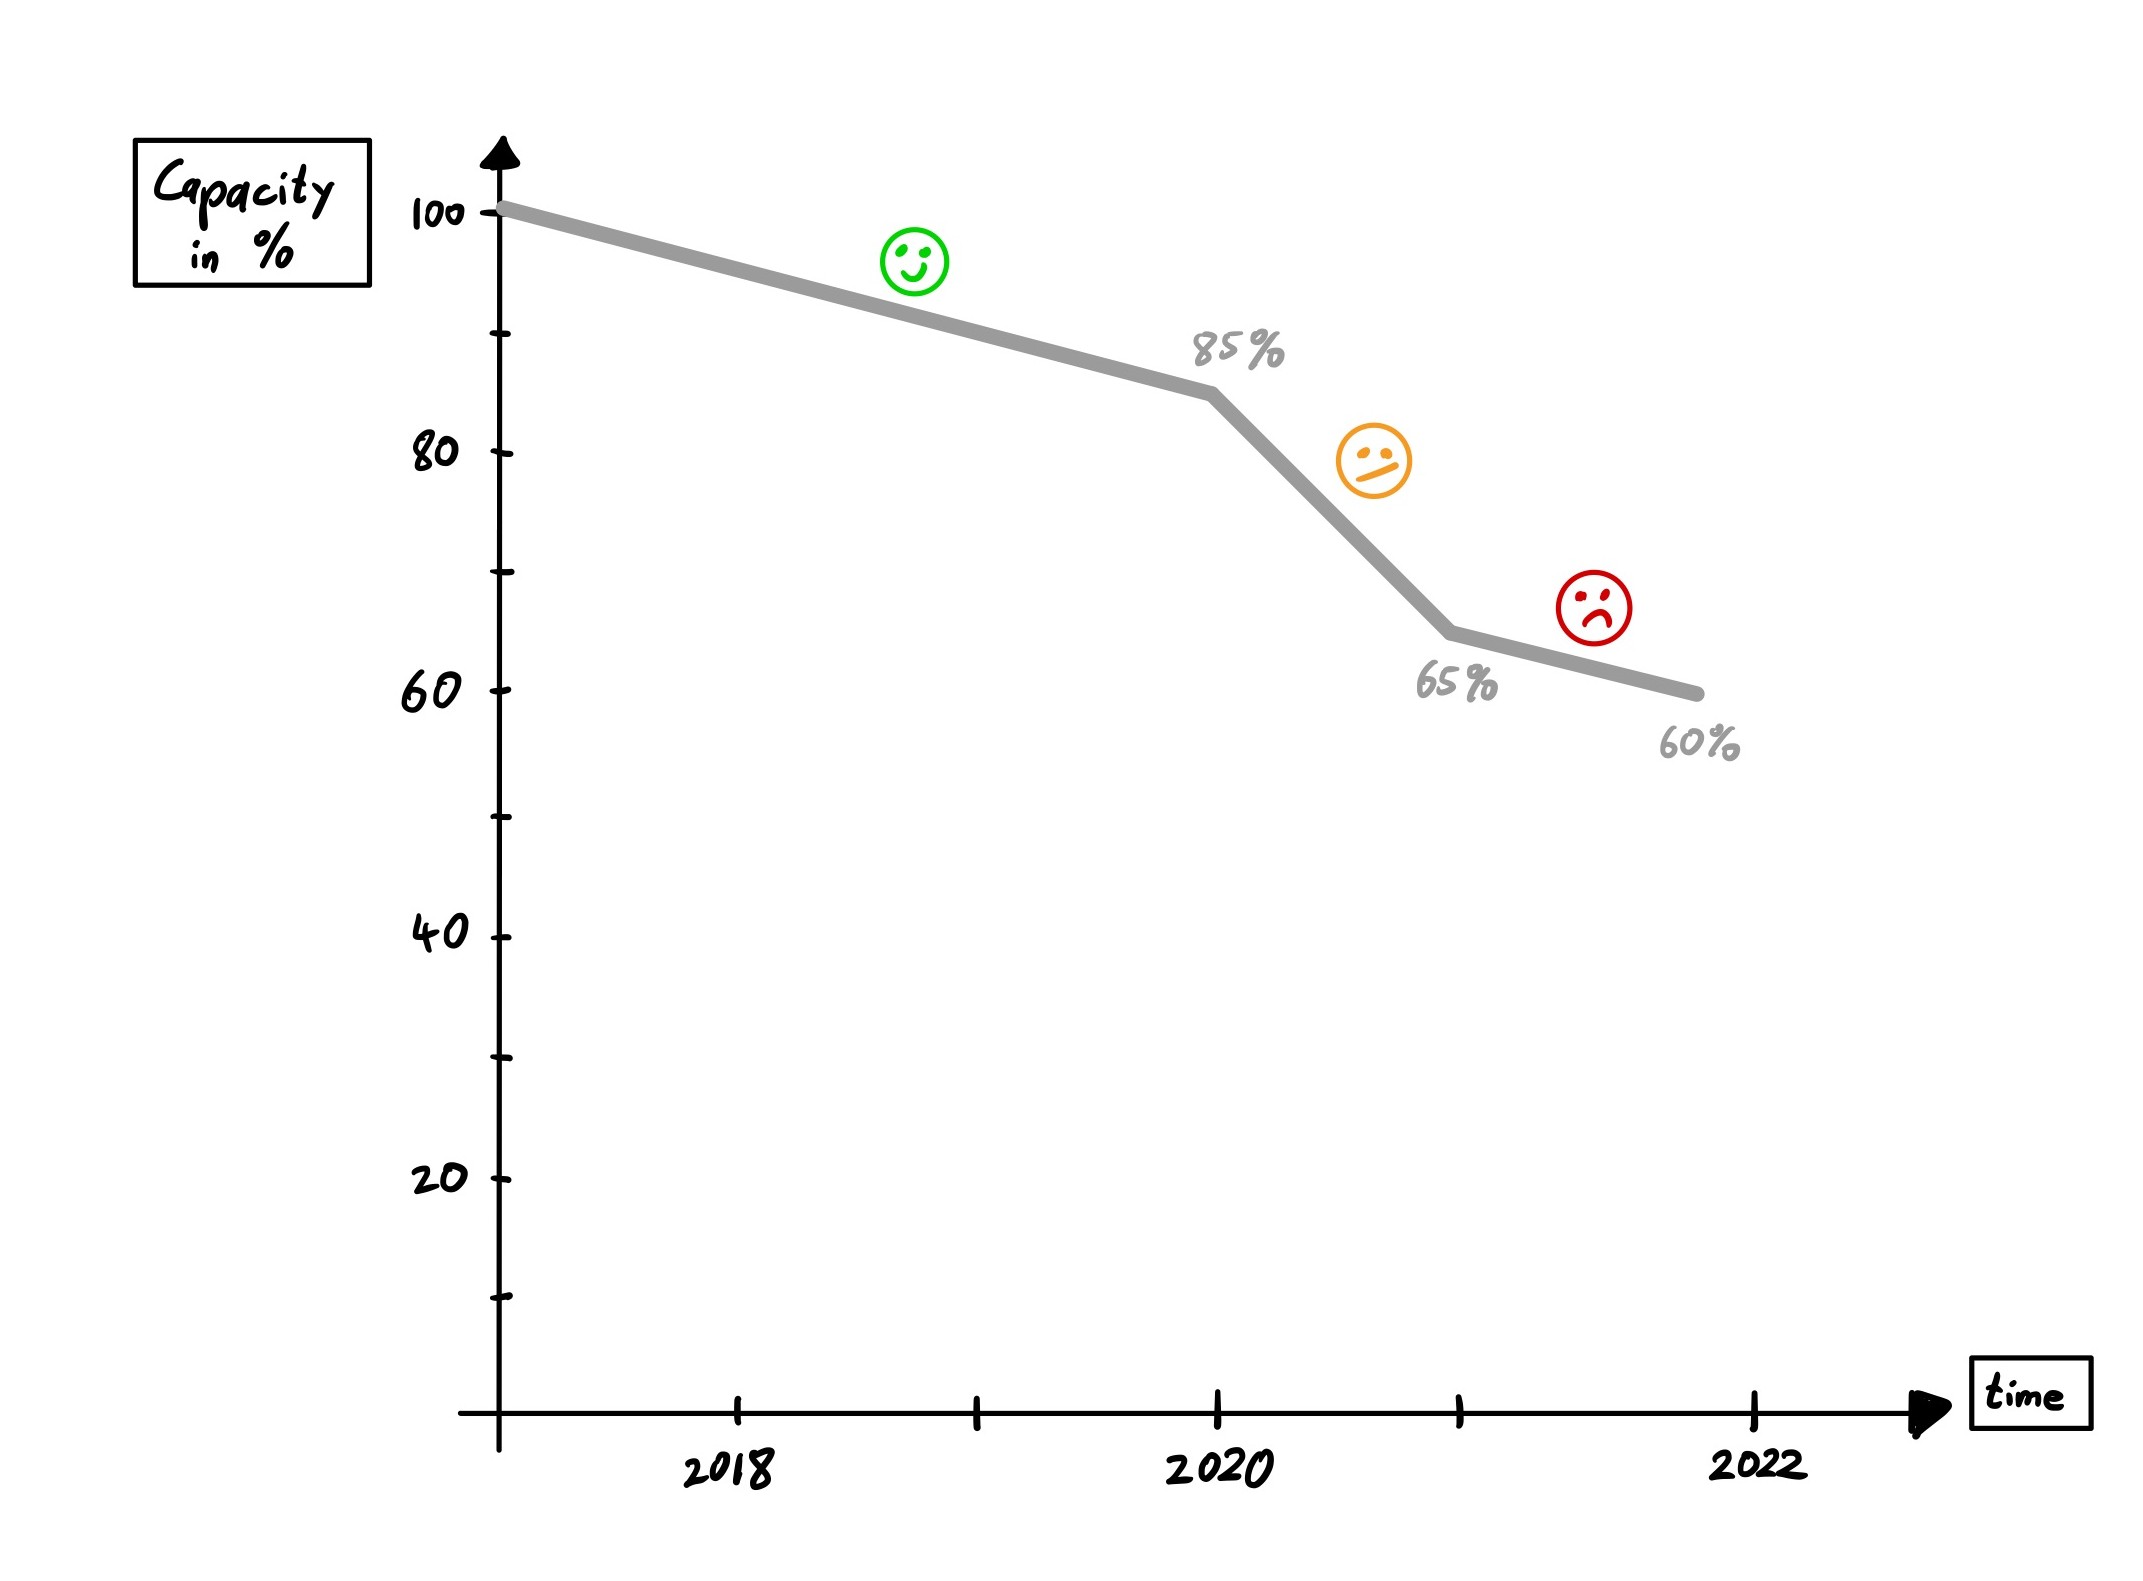
Graph of Battery Capacity Over Time
Factors Impacting Battery Life
Why did this happen? What can I do to prolong the life of my laptop battery?
According to Lenovo, battery life is a function of:
- age
- number of charge cycles
- amount of time at full charge
- high temperature
In other words: anything that causes physical stress to the battery/electrons/chemicals decreases battery life. The battery “wears out” and is no longer able to hold the same amount of charge.
The “amount of time at full charge” killed my laptop battery. Sitting at 100% for a large portion of 2020 was what accelerated its death so significantly.
The “high temperature” killed my phone battery. This is a different story. But keep this in mind next summer when it is over 30°C!
Setting an upper charging limit
To protect my battery, I needed to prevent it from being at 100% for long periods of time (read: days non-stop).
To do this, I wanted to configure the battery to only charge up to a maximum value. One option are command-line tools, such as TLP (more details below). Another option are graphical tools, such as KDE Plasma’s system settings:
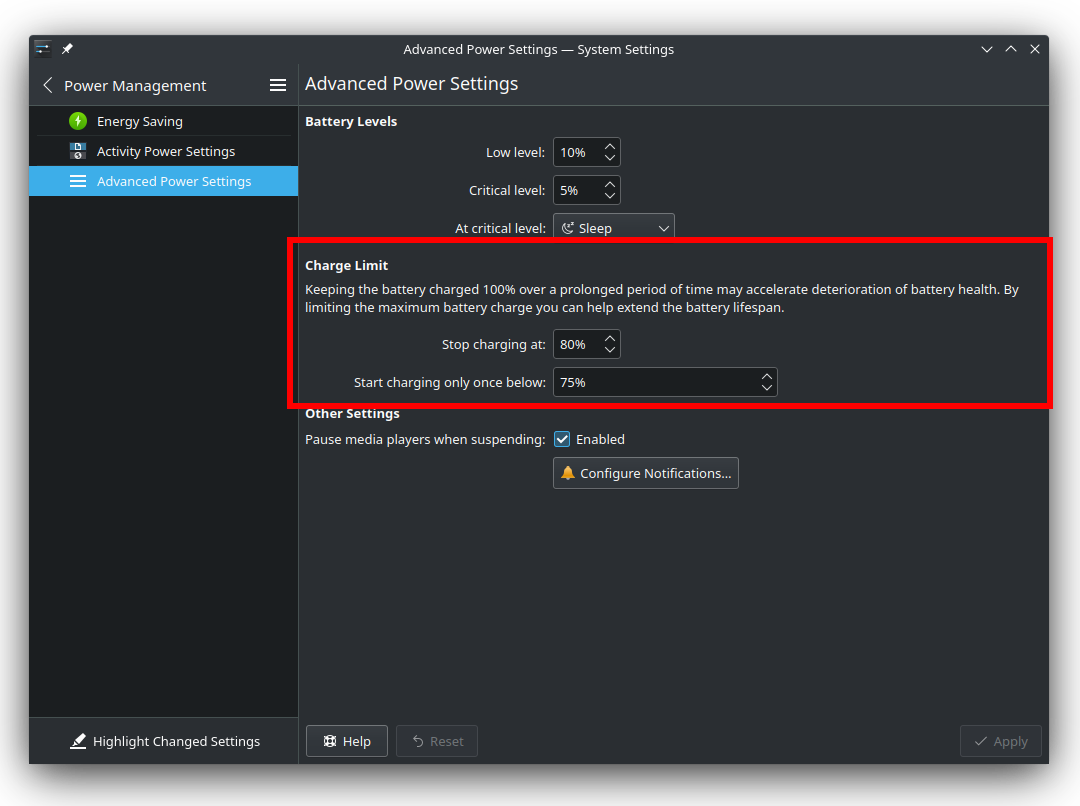
Setting the charge limits in KDE Plasma 5.24 LTS
Personally, I have set the “value to start charging at” and the “value to stop charging at” to 75% and 80% respectively.1 They seem like a reasonable tradeoff, while still having a nearly-full battery for when I pack up and leave my desk. 75% and 80% are also the default values that TLP sets. And Lenovo agrees: “For systems which are always connected to an AC power source, Lenovo recommends setting the upper charge limit to 80% or less.”
Now when my laptop is at the docking station for 2 days, it sits their at 80% instead of at 100%.
The added benefit is that when it sits there at 80% and I run compute-heavy tasks, the 20 or so watt come directly from the charger. It does not impact the battery, i.e. it is saving me some charging cycles (see below).
Reading Battery Statistics
The Linux kernel reads battery statistics from the hardware and exposes them. To read the current power consumption in milli-Watt and the amount of full charging cycles:
cat /sys/class/power_supply/BAT0/power_now
cat /sys/class/power_supply/BAT0/cycle_count
For the former I made myself a bash alias: alias watt="cat /sys/class/power_supply/BAT0/power_now".
I look at watt regularly to get an intuition of how my laptop is doing.
I found the following rule-of-thumb numbers for my system (4-core i5-7200U @ 2.5 GHz):
| Task | Power consumption [Watt] |
|---|---|
| Idle (or slowly reading through a PDF) | 5 W |
| Normal usage (browsing, typing, switching applications) | 5.5 - 6 W |
| Streaming a movie | up to 10 W |
| Compiling on all 4 cores | 20 W |
I also found that screen brightness is not a significant factor (on my laptop!).
At least, it is barely noticeable in the watt readings.
Instead of forcing brightness down to 10% to save power, I now have it at a comfortable 30% most of the time.
For the cycle_count, note that this is the number of full cycles.
I have had my new battery for 8 months (= 240 days) now. Despite using it daily, I am only at 60 cycles.
One contributing factor is that my laptop now spends weekends and home-office days on my desk at the charger.
If you like graphs, KDE Plasma also ships with an Energy Monitor that shows you the historical power consumption:
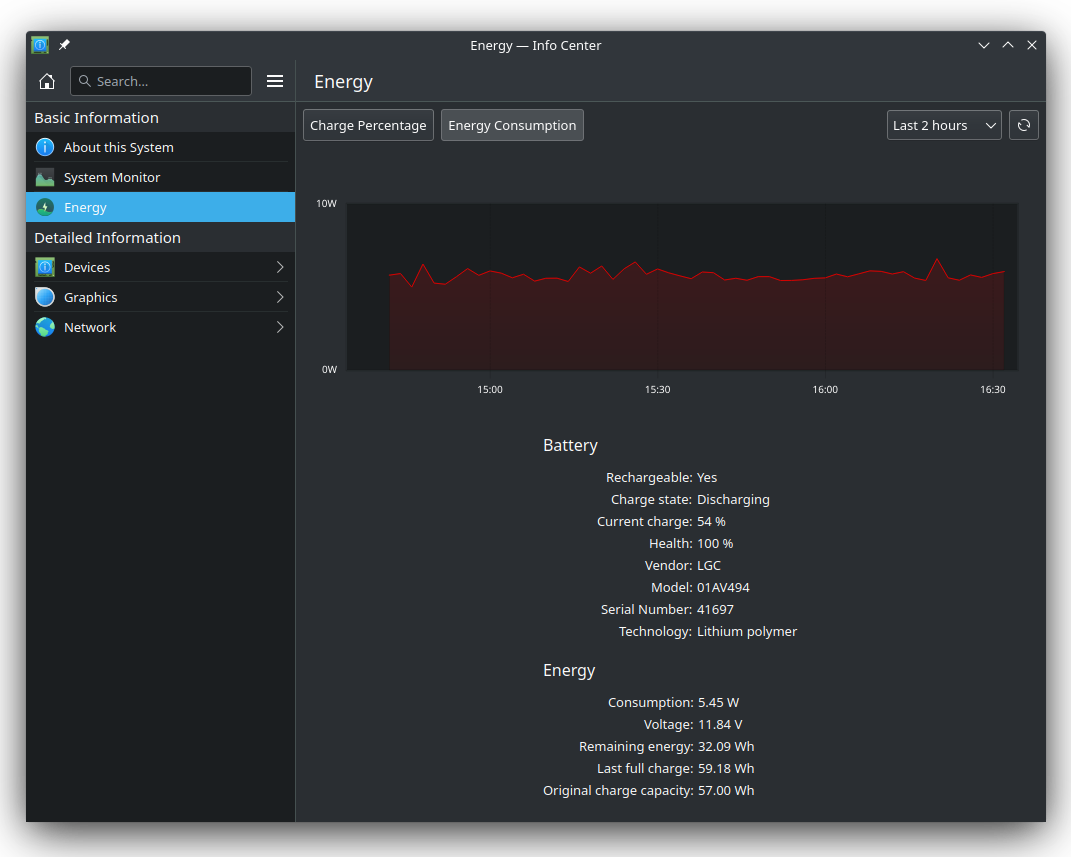
KDE Energy Monitor
Using TLP to read statistics and set thresholds
TLP is a command-line tool that can read battery statistics and configure various settings, such as charging thresholds. In this section I will give a short primer on how I use TLP.
First, install it.
Now you can view the battery statistics:
$ sudo tlp-stat --battery
--- TLP 1.5.0 --------------------------------------------

+++ Battery Care
Plugin: thinkpad
Supported features: charge thresholds, recalibration
Driver usage:
* natacpi (thinkpad_acpi) = active (charge thresholds)
* tpacpi-bat (acpi_call)  = active (recalibration)
Parameter value ranges:
* START_CHARGE_THRESH_BAT0/1:  0(off)..96(default)..99
* STOP_CHARGE_THRESH_BAT0/1:   1..100(default)

+++ ThinkPad Battery Status: BAT0 (Main / Internal)
/sys/class/power_supply/BAT0/manufacturer                   = LGC
/sys/class/power_supply/BAT0/model_name                     = 01AV494
/sys/class/power_supply/BAT0/cycle_count                    =     60
/sys/class/power_supply/BAT0/energy_full_design             =  57000 [mWh]
/sys/class/power_supply/BAT0/energy_full                    =  59180 [mWh]
/sys/class/power_supply/BAT0/energy_now                     =  30780 [mWh]
/sys/class/power_supply/BAT0/power_now                      =   4883 [mW]
/sys/class/power_supply/BAT0/status                         = Discharging

/sys/class/power_supply/BAT0/charge_control_start_threshold =     75 [%]
/sys/class/power_supply/BAT0/charge_control_end_threshold   =     80 [%]
tpacpi-bat.BAT0.forceDischarge                              =      0

Charge                                                      =   52.0 [%]
Capacity                                                    =  103.8 [%]
As mentioned above, you can also obtain the power_supply values by cat-ing the files directly
(this is my watt shortcut).
The tlp-stat command just nicely aggregates them.
Next, configure the charging thesholds.
To do this, create a file /etc/tlp.d/01-charge-thresholds.conf with the following content: 2
START_CHARGE_THRESH_BAT0=75
STOP_CHARGE_THRESH_BAT0=80
Make sure this file has the correct owner and correct permissions:
$ sudo chown root:root /etc/tlp.d/01-charge-thresholds.conf
$ sudo chmod 644 /etc/tlp.d/01-charge-thresholds.conf
Then apply the TLP config by running sudo tlp start.
You should now see these changes when you run sudo tlp-stat -b.
What if you have a trip coming up, and you want to temporarily charge to 100%? Instead of messing with the config, just connect your charger and run:
$ sudo tlp fullcharge
Setting temporary charge thresholds for BAT0:
  stop  = 100
  start =  96
Charging starts now, keep AC connected.
sudo tlp-stat -b shows you the updated thresholds.
Simply run sudo tlp start to revert back to the settings in your config file.
Note: The command tlp start takes the value from the config file, and writes them
to the embedded controller (EC) via ACPI.
tlp fullcharge does the same, but with the default values 96 and 100.
The EC is a piece of hardware that controls the charging process.
This way, charging will stop at 80% even if the laptop is turned off.
But this also means that you have to manually run start or fullcharge for your changes to take effect!
For more information, read the docs,
the FAQ or the manpage (man tlp).
Replacing the Battery
Now I knew how to slow down battery aging, and how to monitor the battery. But what if the battery is already dead?
Disclaimer: repeat this at your own risk. In my case, my laptop was 4 years old, so the warranty was void anyway.
When my old battery reached 65% capacity, I decided to replace it. Only having 6 hours of runtime was getting too impractical.
I ordered a replacement battery on AliExpress for 35 €, including shipping. For comparison: official replacement batteries cost 100-150 €.
Replacing the battery requires only a few screw drivers. I recommend searching YouTube for any replacement video (even if it is not your exact model). It is a good way to get a rough view of what to expect, and to build confidence before you open up your own laptop.
Here are the steps for my ThinkPads (others should be similar):
- Disconnect the charger.
- Discharge the battery to 20-30%. Less electrical charge reduces the risk if something goes badly wrong.
- Touch some grounded metal to ensure you are grounded as well. Prevent electrostatic discharge (ESD).
- Shut down the laptop and reboot into the BIOS.
- In the BIOS, go to Config > Power > Disable Built-In Battery. Then click Enter. (This ensures the power is cut and the battery is fully disconnected from the other electronics inside the laptop. You won’t be able to turn the laptop on again without a charger.)
- Close the lid and turn the laptop upside down.
- Remove the screws that are holding the back plate and remove the back plate.
- Disconnect the internal battery cable.
- Remove the screws that fix the battery in-place.
- Take the old battery out, and put the new one in.
- Screw the new battery in place. Then re-connect the internal battery cable.
- Close the back-plate and screw it tight.
- Connect a charger and boot your laptop.
- Done! Proceed to calibrating the battery.
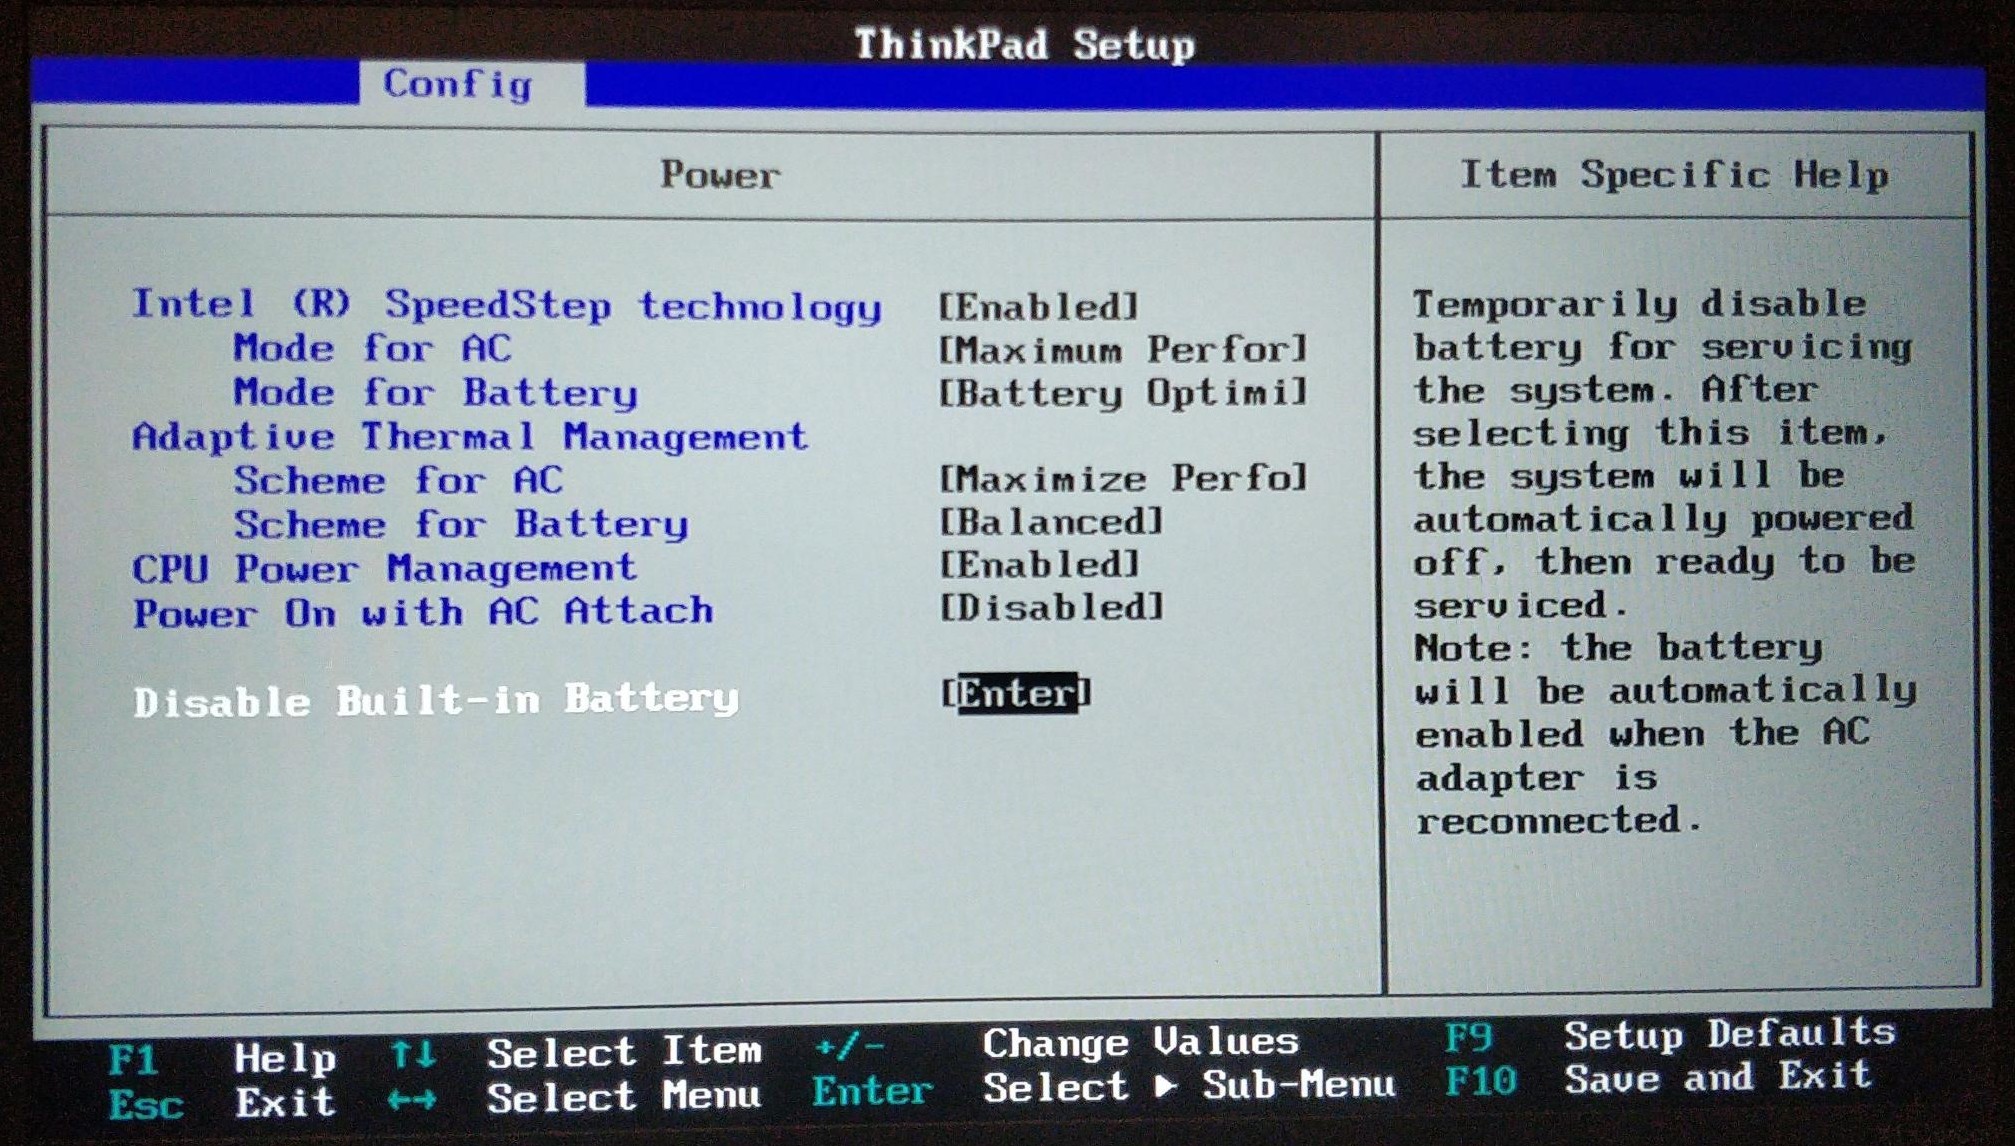
Disabling the battery in the BIOS
Calibrating the new battery
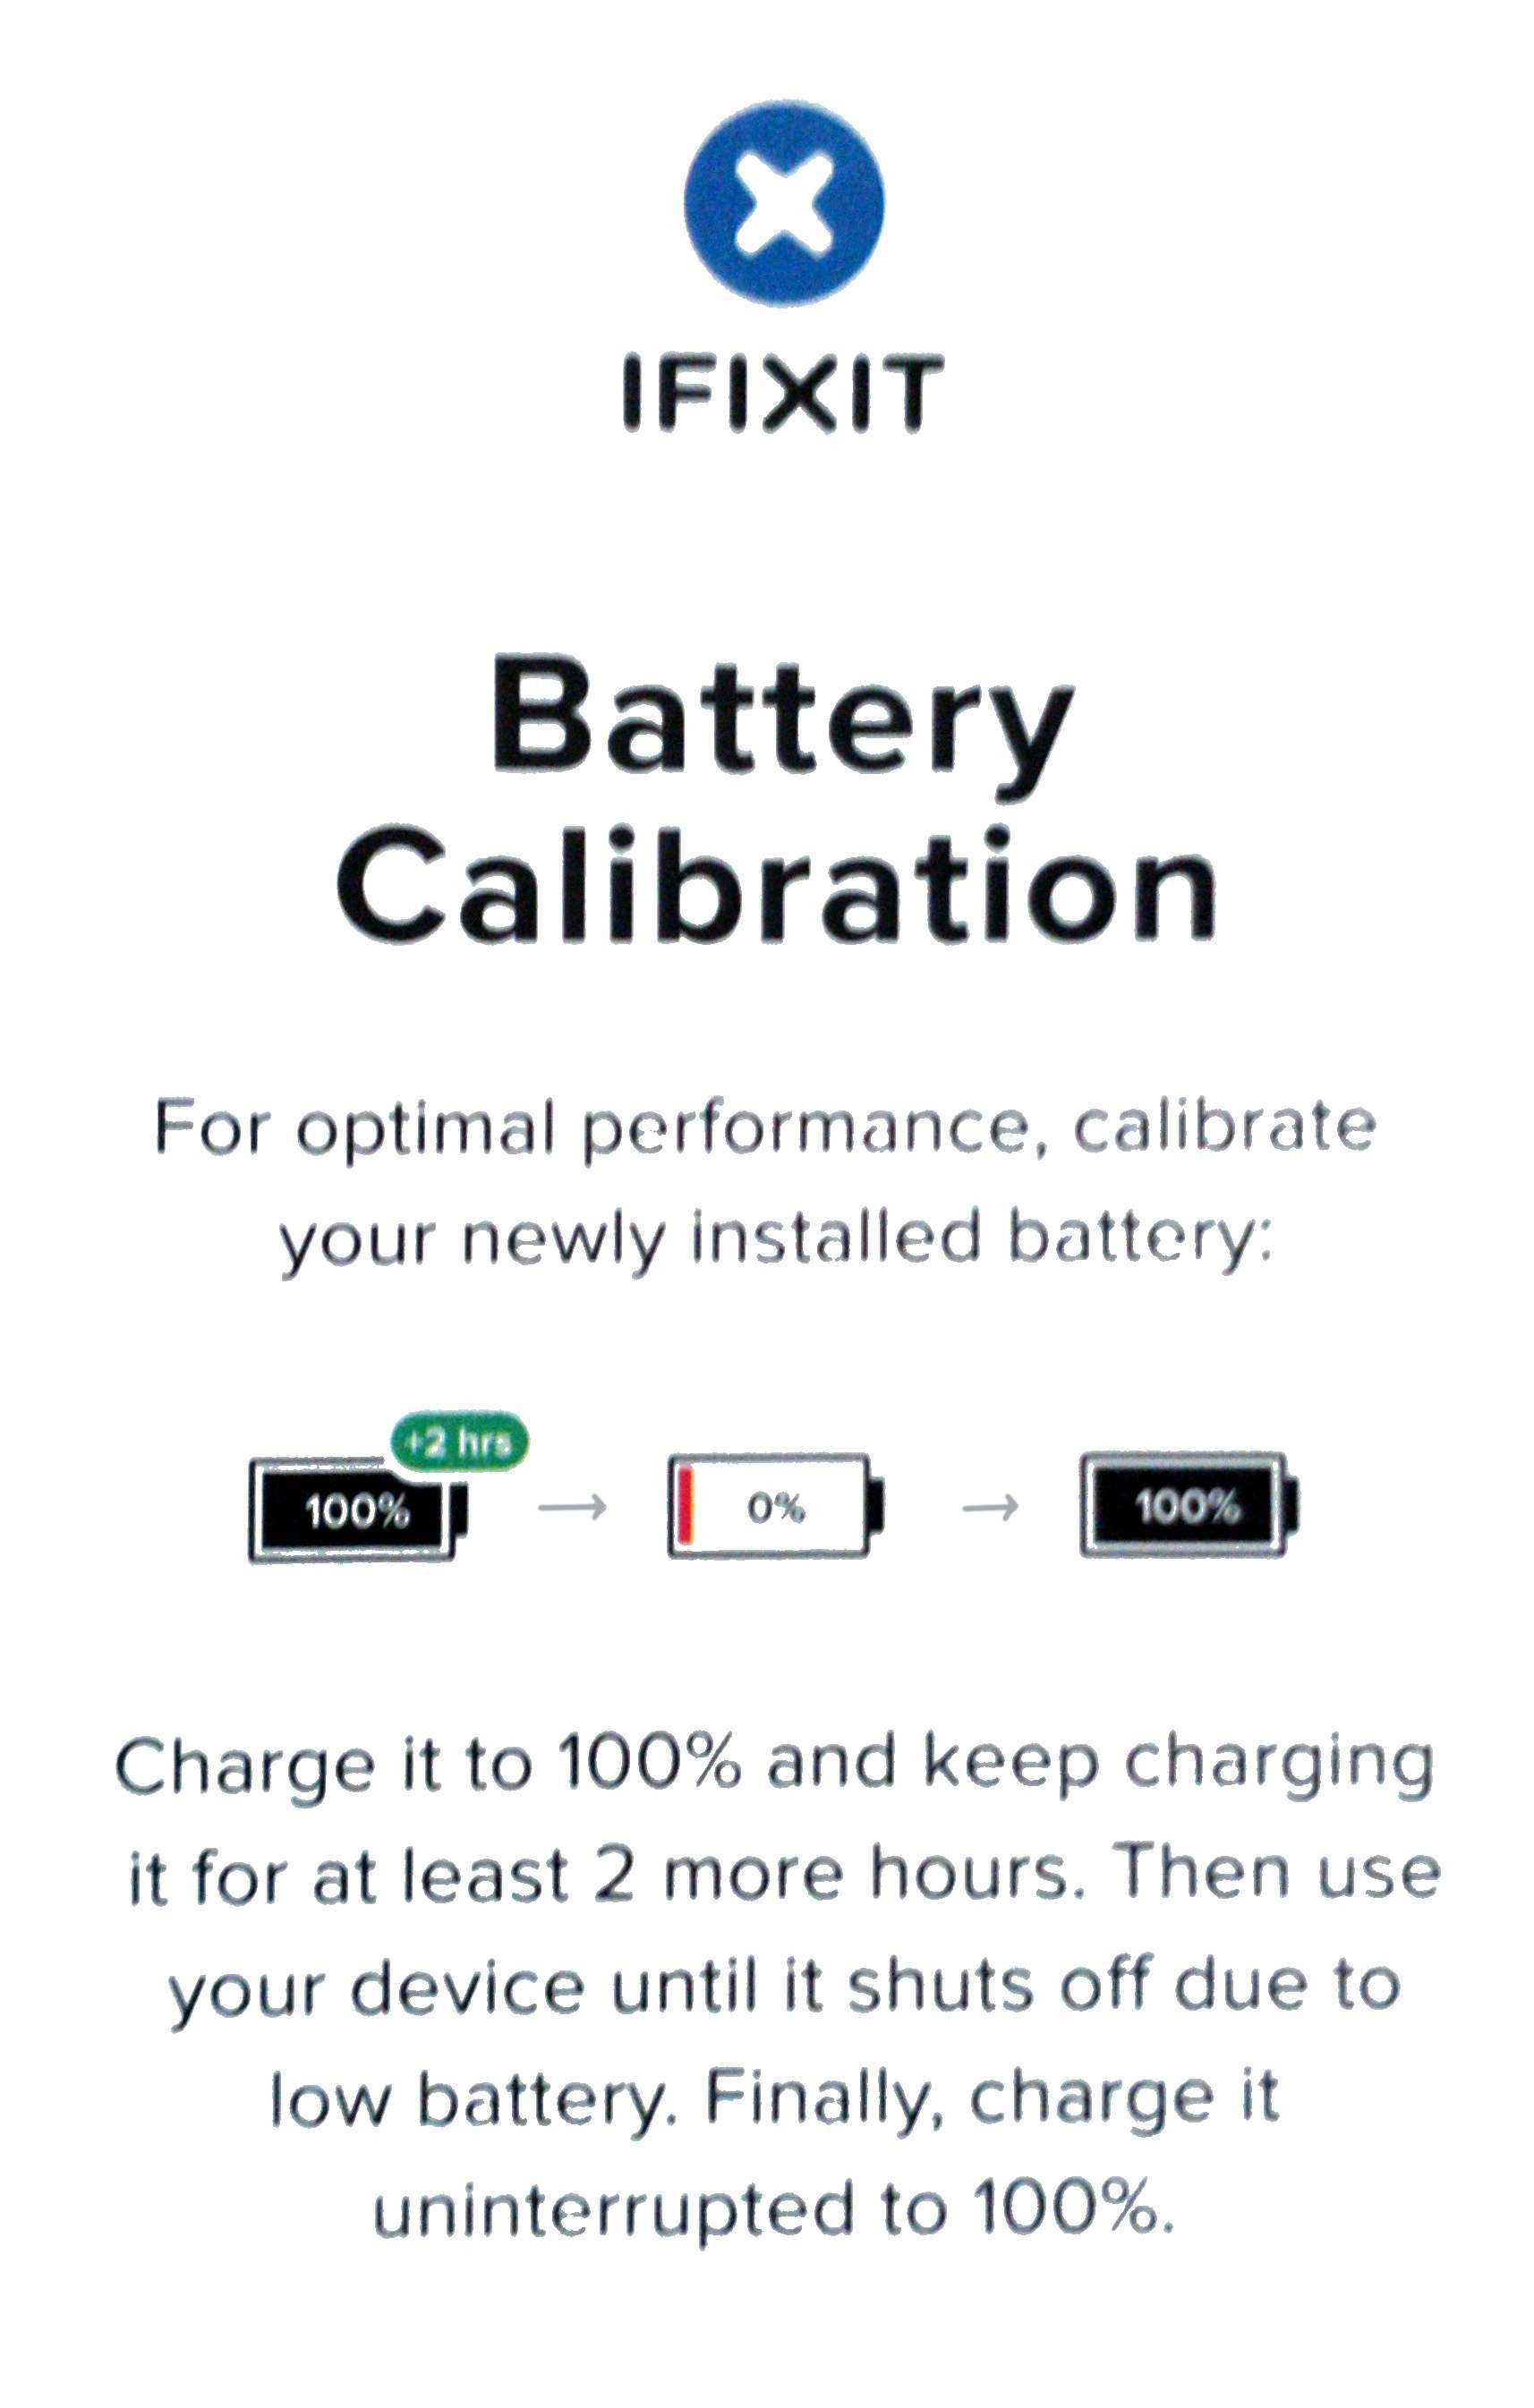
After I installed the new battery, it was time to calibrate it. Calibration means pushing the battery to both the low and the high extreme. This helps the battery controller figure out what level of charge constitutes “full charge” and “empty charge”.
This changes over the lifetime of the battery, because as the battery ages it is able to hold less charge. The controller remembered a lower charge value as “full” from the old battery. Calibrating it means teaching it that “full” is now at a higher charge.
This paper card that iFixit ships with phone replacement batteries sums up the steps:
Determining the Quality of the Replacement Battery
35 € for a laptop battery is rather cheap. Sure, I did some diligence. I compared batteries on AliExpress. I read through comments and reviews. I looked at clues indicating seller reputation and quality. But it is still a guessing game. With seller and buyer so far away, there is little accountability.
How can I verify that the cheap battery is not of low quality? What if the battery reports a higher capacity than it actually has? Can I trust the hardware readings? After all, the “Last full charge = 59.18 Wh” (see Energy Monitor screenshot above) seems strange given that “Design capacity = 57 Wh”.
It turns out that batteries are smart. 3 They have a built-in chip that reports the voltage, current, etc to the laptop. This means that the laptop relies on the values measured and reported by the battery.
This also means that a scam battery can report wrong values. For example, it can report a larger capacity than it actually has. I know that this happens with smartphones: the Android system settings on phones that are cheap “offers” on AliExpress claims that the phone has 16 GB RAM but in reality it only has 0.5 GB RAM! (German news article)
Without taking the battery apart and doing more analysis, I just have to trust the battery.
One data point that I can control, though, is the overall runtime.
With a nominal capacity of 57 Wh and a power consumption of 5.5 W, the new battery should last about 10 hours.
So I measured how long the new battery would last during normal laptop usage.
And indeed: the new battery got me back to running an entire day at university without having to charge.
This has held up so far over the past 8 months.
Because of this, I now also trust the watt readings – they vary with my laptop usage
patterns in the way I expect them to.
I assume the 59.18 > 57 is either due to the uncertainty in the physical measurement/calculation. Or the factory capacity really is too large, to account for manufacturing uncertainties, that is, to prevent returns and angry customers.
Conclusion
In this post I explained what factors impact the lifespan of a modern laptop battery (age, number of charge cycles, amount of time at full charge, high temperature). Based on this, I also explained what you can do to prolong the lifespan (don’t keep it at 100% for long times). I also described how you can view battery statistics (use TLP). Finally, I showed how I replaced my laptop battery.
Note that I only focused on ThinkPads running Linux. Please let me know if you find similar ways to set the charging thresholds on MacOS. There might be, but I haven’t researched it. Apple has Optimised Charging, but this seems to only work when charging overnight. It is not a solution if you keep your MacBook connected to your monitor via USB-C-with-power-delivery during an entire workday — it will charge to 100%.
The lower bound ensures that the battery does not constantly fluctate between “discharging” and “charging”. This would send the electrons back and forth, also wearing out the battery. ↩︎
You could also put these lines in
/etc/tlp.conf. But I prefer leavingtlp.confuntouched, and instead put all my values into thetlp.ddirectory. This way, it is easier to distinguish what are TLP’s factory settings and what are my settings. ↩︎Wikipedia has more information on battery management systems. I originally learnt about the Smart Battery System (SBS) standard from this blog post about reversing the embedded controller firmware (the controller in the ThinkPad, not in the battery). That blog post also references this Black Hat paper on reversing the battery firmware, which is an equally interesting read. ↩︎
2241 Words
2022-12-04 14:00 +0000
